
Create Data stream
Create New Data Stream
On the Data Stream screen, click CREATE NEW DATA STREAM to create a new Data Stream. Refer to the following screen
Figure 1 Create Data Stream
2. After clicking the button, the CREATE NEW DATA STREAM screen is displayed.
2.1. SFTP Push Data Stream with Authentication Type selected as Username/Password creation screen
Figure 2 Create Data Stream
2.2. SFTP Push Data Stream and Authentication Type selected as Public/Private Key creation screen
Figure 3 Create Data Stream
Enter or select the following details in the corresponding fields for SFTP push case, fields marked with "|"are mandatory
Field | Description |
|---|---|
Stream Name | Enter the Stream name. |
Event Type | Select the type of Event Types For example, Mobility Events,Usage Events |
Mobility Events | Select the Event, For example All, Authentication, Cancel Location, Data Session, Purge Subscriber, SMS, Update Location these fields will be listed in alphabetical order. |
Usage Events | Select Usage Event, Usage Events will not have an option to select specific fields and all fields will be available by default, For example DATA Usage and SMS Usage. |
Stream type | Select the type of SFTP stream For example, SFTP Push,SFTP Pull or Callback API(Bulk) |
Contact Name | Enter a contact name to setup SFTP |
Contact Email | Enter the email ID for contact. |
Host Name | Enter the hostname of SFTP server. |
Destination IP address | Enter Destination IP address of the SFTP server. |
Port | The port of customer's SFTP server. |
Authentication Type | Select authentication type - username/password or Public/Private Key. |
Username | Enter the account name that will be used to connect to your SFTP server. (if Authentication type- Username/Password) |
Password | Enter the password of the account that will be used to connect to your SFTP server. (if Authentication type- Username/Password) |
Path | Enter the path relative to the home directory of the customer. |
Frequency | Select the frequency among 10 min, once per hour, once per day. how often you want files to be transfer to your server. |
Comment | Enter text in the comment field. |
3. SFTP Pull Data Stream and Authentication Type selected as Public/Private Key creation
Figure 4 Create Data Stream
3.1. SFTP Pull Data Stream and Authentication Type selected as Username/Password creation screen
Figure 5 Create Data Stream
Enter or select the following details in the corresponding fields. Fields marked with "|"are mandatory
Field | Description |
|---|---|
Stream Name | Enter the Stream name. |
Event Type | Select the type of Event Types For example, Mobility Events,Usage Events |
Mobility Events | Select the Event, For example All, Authentication, Cancel Location, Data Session, Purge Subscriber, SMS, Update Location these fields will be listed in alphabetical order. |
Usage Events | Select Usage Event, Usage Events will not have an option to select specific fields and all fields will be available by default, For example DATA Usage and SMS Usage. |
Stream type | Select the type of SFTP stream For example, SFTP Push,SFTP Pull or Callback API(Bulk) |
Contact Name | Enter a contact name to setup SFTP |
Contact Email | Enter the email ID for contact. |
Source Hostname | Enter the hostname of the server that will be connected to the SFTP server. |
Source IP address | Enter IP of the server that will be connected to the SFTP server |
Authentication Type | Select authentication type - username/password or Public/Private Key. |
Public Key used for Authentication | Enterprise to provide public key for the username(account) provided by BICS |
Frequency | Select the frequency among 10 min, once per hour, once per day, how often you want files to be transfer to your server. |
Comment | Enter text in the comment field. |
4. After entering/selecting required fields click on Submit. A confirmation message is displayed as below,
Figure 6 Info message
4.1 Once data stream is created an email will be sent to the list of emails(Account email, contact email, first user email).
4.2 By default stream will be deactive and a background SFTP establishment process needs to be completed before stream is activated. As soon as it is activated stream will change to stopped.
5. For Callback API(Bulk) data stream creation click on Callback API (Bulk) radio button, on click of Callback API (Bulk) details form changes. Refer to the following screen.
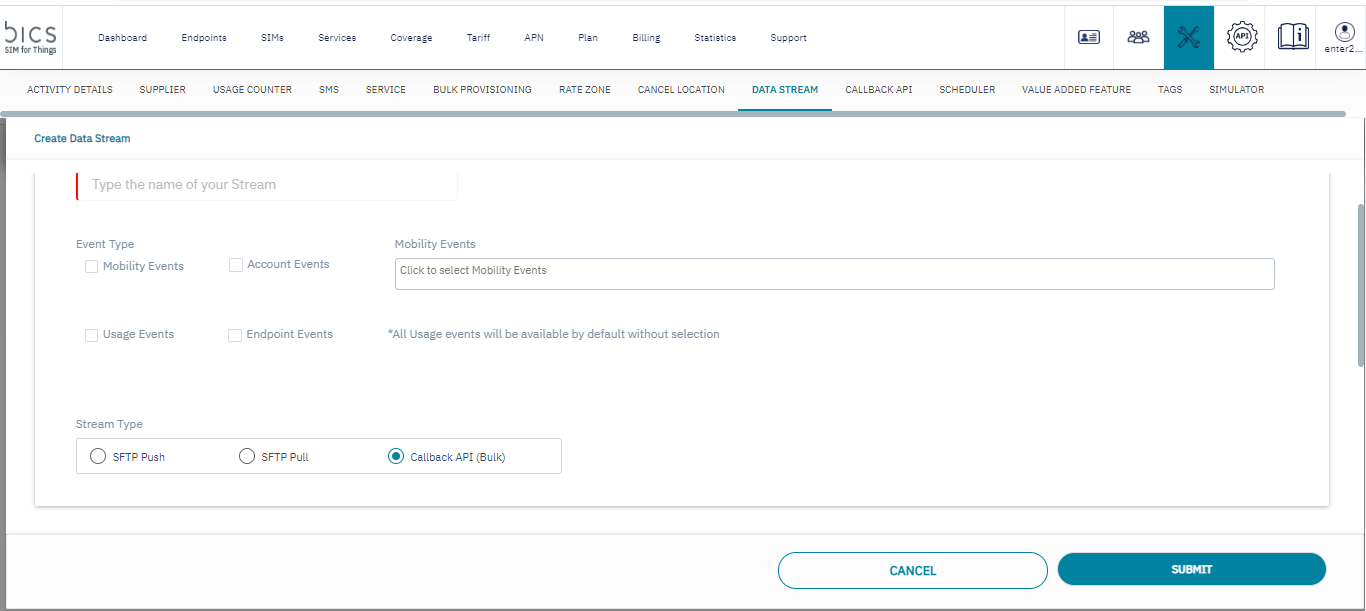
Figure 7 Callback API selection
Enter or select the following details in the corresponding fields. Fields marked with "|"are mandatory
Field | Description |
|---|---|
Stream Name | Enter the Stream name. |
Event Type | Select the type of Event Types For example, Mobility Events, Usage Events |
Mobility Events | Select the Event, For example All, Authentication, Cancel Location, Data Session, Purge Subscriber, SMS, Update Location these fields will be listed in alphabetical order. |
Usage Events | Select Usage Event, Usage Events will not have an option to select specific fields and all fields will be available by default, For example DATA Usage and SMS Usage. |
Account Events | Select Account Event, Account events will generate events for Callback API URI should configure for Account events from "CALLBACK URI" in TOOLSCALLBACK API Account Events will be transferred using URI configured for the process name "Account Events (Bulk)". |
Endpoint Events | Select Endpoint Event, Endpoint events will generate events for Callback API URI should configure for Endpoint events from "CALLBACK URI" in TOOLSCALLBACK API Endpoint Events will be transferred using URI configured for the process name "Endpoint Events (Bulk)". |
Stream type | Select the type of stream For example, Callback API(bulk) |
5.1 After entering/selecting required fields click on Submit. A confirmation message is displayed as below
Figure 8 Success message
5.2 By default Callback API(Bulk) stream will be activated automatically from Bics level and new stream should be created as Stopped.
If data stream creation reached maximum limit, on click of create new data stream button receives an alert message. Refer to the following screen
Figure 9 Alert Message